How to Fit a Taper Lock Bush
The Taper Lock bush, also referred to as a Taper bush or Taper Fit bush, is a locking mechanism commonly used in Power Transmission Drives for locating pulleys, sprockets, and couplings to shafts. The Taper Lock bush is pre-bored and keyed to match the required shaft and keyway diameters. Two popular brands of bush include the Martin Taper Lock bush and the Fenner Taper Lock bush. The outside of the bush is tapered to match the component bore that is to be located on the shaft.
The Taper lock bush is manufactured from precision cast iron, and is machined to a high quality finish. It is computer-etched for ease of size identification and it may be manufactured in steel or stainless steel upon request. Taper bushes are available in both imperial and metric shaft sizes, ranging from 0.375 inches up to 5 inches, and 9 mm up to 125 mm. All quality manufacturers will also supply an installation instruction sheet with the bush.
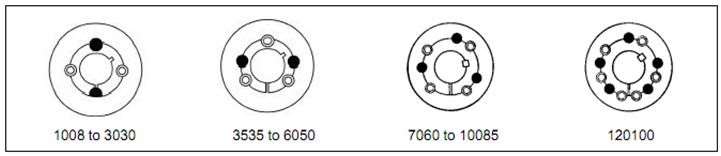
Both Martin and Fenner Taper Lock bushes are manufactured in their full range of bushes with an even number of holes, i.e. a forth, balance, hole. This design is dynamically balanced for high speed applications and is available off the shelf at CBC outlets in a range of sizes, from 1008 to 5050. Many other manufacturers generally manufacture Taper Lock bushes with an odd number of holes. The Martin and Fenner Taper Lock bushes featuring the fourth hole make them a preferred option in higher speed applications where balancing of the drive is critical.
Installation of a Taper Lock Bush
Installation of a Taper Lock bush, including Martin or Fenner Taper Lock bush components, is as follows:
Screws should be tightened alternately and evenly until all screws are pulled up and the bushing is square into the hub.
- The Taper Lock bush needs to be thoroughly cleaned, removing all traces of oil, grease, dirt, and metal filings. Clean the shaft, the bore, the outside of the bushing, and the bore of the hub in which the bush is to be installed into, ensuring the bush is removed from the hub, should it already be installed.
- Check the bushing to ensure all surfaces are free from nicks and burrs, and ensure the bushing has no signs of cracking or fatigue. Place the bushing into the hub and match half holes to make complete holes. It is important to note that the holes need to be matched, not the threads. Each hole will be threaded on one side only.
- Oil threads, the point of the set screws or threads, and under the head of the cap screws. Then place the screws loosely into the holes that are threaded on the hub-side, as shown in Figure 1 below.
- Ensure that the Taper Lock bush is free in the hub, then slip the assembly onto the shaft and locate in the desired position. Insert the correctly sized key into the shaft keyway, ensuring the key is a press fit into the shaft keyway. Ensure there is an air gap between the top of the key and the bushing keyway slot. This will prevent cracking of the bush. IMPORTANT: Ensure that there is no oil or lubricant between the taper on the outside of the bushing and the taper bore of the hub, to which the bushing is being installed.
- Screws should be tightened alternately and evenly until all screws are pulled up and the bushing is square into the hub.
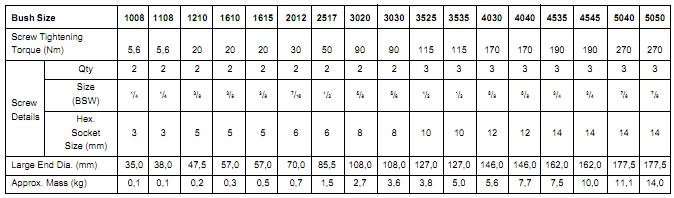
- Using a hammer and block, or sleeve, against the large end of the Taper Lock bush will help to avoid damage to the bushing. Lightly tap against the busing to ensure it is seated squarely. The screws are then tightened further. A torque wrench is used to tighten the screws alternatively and evenly until they are all to the recommended torque setting. This information is available from the installation sheet that accompanies any new Taper Lock bush. See example chart below (figure 3), or ask for this information at any CBC office.
- Repeat this alternate hammering and screw tightening until the specified torque is achieved and no longer requires tightening following hammering. IMPORTANT: After a period of running under normal conditions, it is suggested that the application be reviewed to ensure the torque settings of the screws are accurate, and do not need re-tightening.
- Fill the holes that are not used with grease or silicone sealant to prevent them from filling with dirt and/or rust.
Removal of a Taper Lock Bush
Removal of a Taper Lock bush, including Martin or Fenner Taper Lock bush components, is as follows:
- Remove all screws, oil threads, and the point of the set screws or threads, under the head of the cap screws.
- Insert screws into the holes that are threaded on the bushing side, as shown in Figure 2. In sizes where washers are found under the screw head, be sure to use these washers. Please note that there should always be one screw left over that is not used when removing the bushing.
- Tighten the screws alternately until the bushing is loosened in the hub. If the bushing does not loosen immediately, tap on the hub to assist remove.
To view the demonstration video showing installation and removal of a Taper Lock bush, please Click Below;

When installing or removing a Taper Lock bush, it is imperative that no lubrication be used between the taper. The presence of lubricant on the tapered surfaces is not desirable, as the taper bushing relies on friction to operate effectively, and lubricants reduce friction. CBC use industry standard Part Numbers to identify the specifications of each Taper Lock bush or Taper bush. For example;
| Part Number 1210-020 | |
| 12 | refers to 1.250 inch maximum bore |
| 10 | refers to 1.000 inch length through the bore |
| -020 | refers to 20 mm bore, complete with standard keyway |
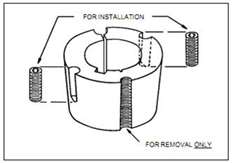 Figure 2